This article describes detail settings of Nginx Cache Controller plugin.
WordPress sites running on AMIMOTO AMIs come with NGINX Reverse Proxy Cache. This cache module is pre-configured and replaces other commonly used plugins for caching.
We recommend using this plugin because it's designed for our AMI and runs at the server level, rather than just within WordPress.
The NGINX Cache Controller default settings come set up with default settings you'll see after startup.
Expiration Settings of Cache
Nginx Cache Controller can configure the expiration time for each page type.

This expiration time is defined by using X-Accel-Expires header and telling the time to the reverse proxy.
However, the default settings of Nginx ignores the X-Accel-Expires header received from fastcgi, so it is required to add the settings below to grant a permit to accept some response headers including A-Accel-Expires.
For example, it is configured as below for the default of Amimoto AMI.
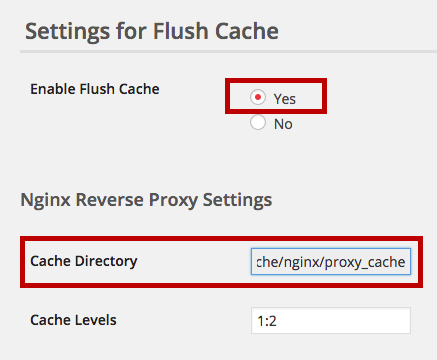
Setting for Deleting Cache Automatically
To delete cache automatically, the settings below must be required:
- Enable Flush Cache is set to Yes.
- The path of cache that Nginx Cache Controller expects and the path of the reverse proxy cache are same.
- WordPress (backend web server) has a permission to write on the cache of reverse proxy.
So, the settings of Nginx are below:
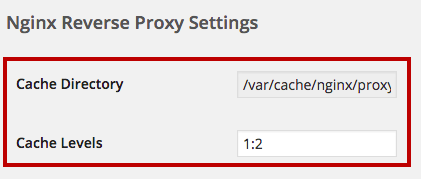
proxy_cache_path
An example of Nginx settings for matching the default settings of Nginx Cache Controller:
Here is the example from Amimoto AMI.
The important parts of above are the path of/var/cache/nginx and /var/cache/nginx/proxy_cache, and the value of levels of1:2 .
When these settings don’t match the ones of Nginx Cache Controller, it can’t find the cache path, so you can’t delete cache.
proxy_cache_key
Nginx reverse proxy creates a cache for each request from a browser, and saves it as a file name that is generated from the value of proxy_cache_key with md5 hash.
Nginx Cache Controller assumes the value of proxy_cache_key as below and delete cache.
So, if the setting is wrong, it will be impossible to delete the cache because the right name of cache can’t be obtained.
You can change the value by nginxchampuru_get_reverse_proxy_key filter hood in Nginx Cache Controller, though also you need to change the value of the reverse proxy.