How to set up SSL for my instance?
You can add it on the instance at any time. Here's how to enable.
Also, please make sure digital certificate such as Let's Encrypt has been installed to the instance.
Step 1. Creating ssl.default.conf file
Create ssl.default.conf under /etc/nginx/conf.d/ after accessing server as a root user.
Replace {your EC2 Instance ID} with your EC2 instance ID or name of virtual host.
You may copy the same line of /etc/nginx/conf.d/default.conf and paste there.
Add the paths of server certificates (/path/to/cert.pem) and secret key (/path/to/cert.key), then restart the following command:
service nginx restart
Sample of ssl.default.conf file
server {
    listen      443 default ssl http2;
    server_name _;
    root        /var/www/vhosts/{your EC2 Instance ID};
    index       index.html index.htm;
    charset     utf-8;

    ssl_certificate      /path/to/cert.pem;
    ssl_certificate_key  /path/to/cert.key;
    ssl_protocols  TLSv1 TLSv1.1 TLSv1.2;
    ssl_prefer_server_ciphers on;
    ssl_ciphers AESGCM:HIGH:!aNULL:!MD5;
    ssl_session_cache   shared:SSL:10m;
    ssl_session_timeout 5m;

    access_log  /var/log/nginx/ssl.access.log  main;
    error_log   /var/log/nginx/ssl.error.log;

    include     /etc/nginx/drop;

    add_header X-Cache-Status $upstream_cache_status;
    expires $expires;

    set $mobile "";
    #include /etc/nginx/mobile-detect;

    include     /etc/nginx/wp-front;

    location ~* /(phpmyadmin|myadmin|pma) { access_log off; log_not_found off; return 404; }

    #
    # redirect server error pages to the static page /50x.html
    #
    error_page  502 503 504  /50x.html;
    location = /50x.html {
        root   /usr/share/nginx/html;
    }
}
Step 2. Modifying security group settings
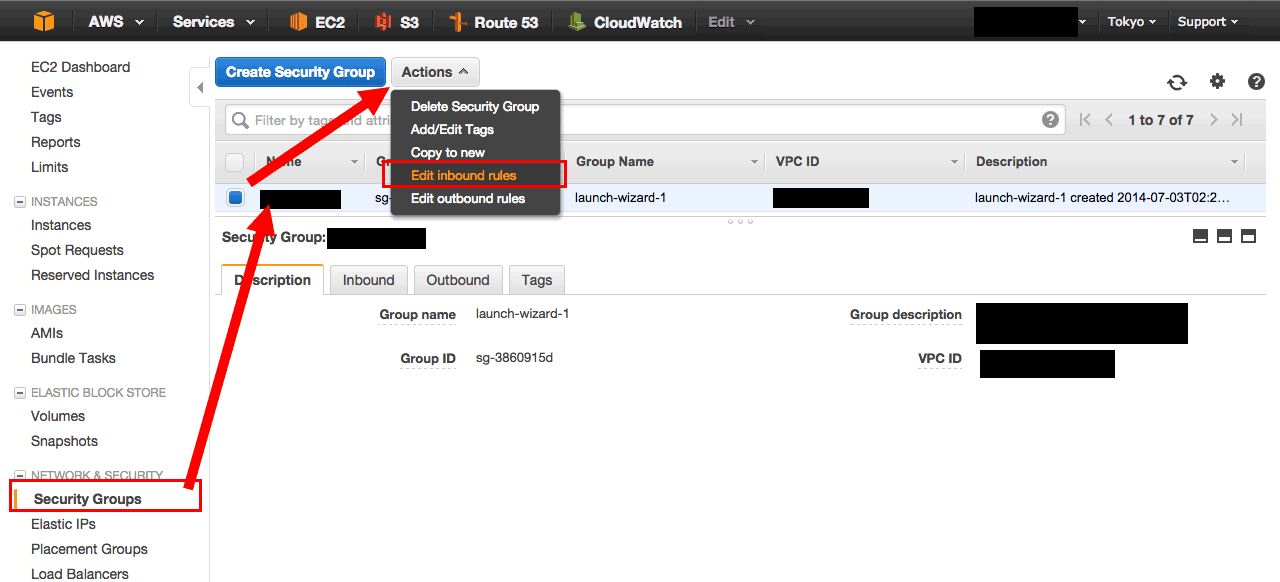
After modifying ssl.default.conf, modify instance's security group to communicate in HTTPS between server and browser.
- Navigate to Security Groups under EC2
- Choose security group of the instance
- Click "Edit inbound rules" under "Action"

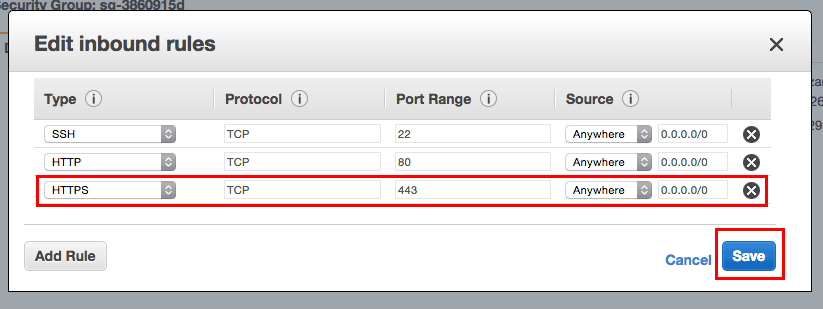
Add "HTTPS", then Save to apply changes.

That's all.
Confirm HTTPS communication is succeeded.